一直断续使用VirtualBox运行一些测试,最近遇到了一个需要调整 虚拟机(CentOS 7) 磁盘大小的问题,总结记录在这里。
问题:主机是Windows 10,使用VirtualBox运行Centos 7虚拟机作为测试server,无图形界面, 当前分配的虚拟磁盘是4GB,需要扩充磁盘空间到10GB。创建虚拟磁盘时使用的Fixed Size, 没有选Daynamicall allocated, 。
解决办法: 分两步:
- 在Windows主机上扩充磁盘空间
- 在虚拟机Centos 7内调整分区以使用扩充后的磁盘空间
1. 在Windows主机上扩充磁盘空间
VirtualBox安装后就自带了调整命令工具VBoxManage (默认安装路径的话它在C:\Program Files\Oracle\VirtualBox),命令格式如下:
VBoxManage modifymedium imageFile --resize newSizeMb
实际运行后发现,由于我在创建时选择了vmdk的磁盘格式,而此命令只支持VDI和VHD格式,且只能扩大不能缩小, 所以需要先执行一个clone操作并转换为支持的vdi格式后才可以继续调整空间。clone还是使用VBoxManage命令,加参数clonemedium, 再加参数 --format DVI 指定输出文件格式为DVI:
C:\Users\xx\VirtualBox VMs\centos7-4G>VBoxManage clonemedium centos7-4G.vmdk centos7-4G.vdi --format VDI
0%...10%...20%...30%...40%...50%...60%...70%...80%...90%...100%
Clone完毕后就得到了vdi格式文件,就可以对它扩大空间了:
C:\Users\xx\VirtualBox VMs\centos7-4G>VBoxManage modifymedium centos7-4G.vdi --resize 10000
0%...10%...20%...30%...40%...50%...60%...70%...80%...90%...100%
这个命令执行起来很快,基本就是标注一下。得到新的磁盘镜像后,可以把虚拟机里的替换掉,也可以新创建一个虚拟机使用这个镜像。
2. Centos 7内调整分区以使用扩充后的磁盘空间
在Windows 主机端调整了磁盘空间,增加的空间并没没法被内部的虚拟机Centos 7直接使用。此时运行fdisk, 可以看到系统识别到了新增加的空间(sda 显示为10.5GB)但是系统系正在使用的空间还是以前的4GB (/dev/mapper/centos-root: 3145 MB),因此需要扩充这个分区:
[root@localhost centos]# fdisk -l

Disk /dev/sda: 10.5 GB, 10485760000 bytes, 20480000 sectors
Units = sectors of 1 * 512 = 512 bytes
Sector size (logical/physical): 512 bytes / 512 bytes # 每个扇区512字节

   Device Boot      Start         End      Blocks   Id  System
/dev/sda1   *        2048     1050623      524288   83  Linux
/dev/sda2         1050624     8249343     3599360   8e  Linux LVM

Disk /dev/mapper/centos-root: 3145 MB, 3145728000 bytes, 6144000 sectors
Disk /dev/mapper/centos-swap: 536 MB, 536870912 bytes, 1048576 sectors
Centos 7 采用LVM方式 来 管理磁盘,可以先看看当前LVM的管理方式:
[root@localhost centos]# pvs
  PV         VG     Fmt  Attr PSize  PFree
  /dev/sda2  centos lvm2 a--  <3.43g    0  # PV已全部使用,无空余

[root@localhost centos]# vgs
  VG     #PV #LV #SN Attr   VSize  VFree
  centos   1   2   0 wz--n- <3.43g    0 # VG已全部使用,无空余可用于扩展

[root@localhost centos]# lvs
  LV   VG     Attr       LSize   Pool Origin Data%  Meta%  Move Log Cpy%Sync Convert
  root centos -wi-ao----  <2.93g
  swap centos -wi-ao---- 512.00m
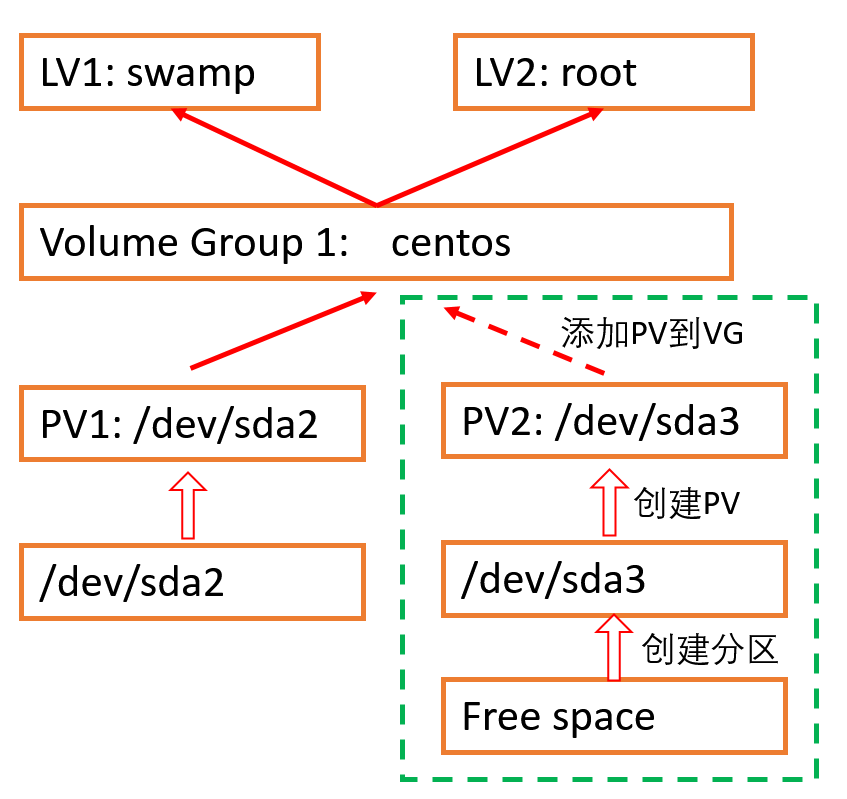
可以看到当前系统只有1个VG, 名为centos,由1个PV( /dev/sda2) 构成,参见下图,我们现在要做的就是虚线框里那块,将上面调整后多余的空白空间创建为新的分区sda3,然后基于它创建新的PV2,再把这个新PV2添加到VG里,然后VG里就有了多余空间,可以用来扩充root这个LV了。
现在开始操作。
使用空余空间创建新分区:
[root@localhost centos]# fdisk /dev/sda  # 对sda这个磁盘进行操作
Welcome to fdisk (util-linux 2.23.2).

Command (m for help): n  # 添加新分区
Partition type:
   p   primary (2 primary, 0 extended, 2 free)
   e   extended
Select (default p): p # 主分区
Partition number (3,4, default 3): 3 #默认3,因为已有sda1, sda2两个分区,接下来这个将创建为sda3
First sector (8249344-20479999, default 8249344): #默认回车即可,默认空余空间起始
Using default value 8249344
Last sector, +sectors or +size{K,M,G} (8249344-20479999, default 20479999):#默认回车即可,默认空余空间末尾
Using default value 20479999
Partition 3 of type Linux and of size 5.9 GiB is set

Command (m for help): p # 打印当前配置,可以看到新分区sda3了,但格式不对,需要格式化为Linux LVM才可以进行后续操作

   Device Boot      Start         End      Blocks   Id  System
/dev/sda1   *        2048     1050623      524288   83  Linux
/dev/sda2         1050624     8249343     3599360   8e  Linux LVM
/dev/sda3         8249344    20479999     6115328   83  Linux

Command (m for help): t # change partition Id, 修改分区Id,也就是分区类型
Partition number (1-3, default 3): 3  #刚才创建的3
Hex code (type L to list all codes): 8e
Changed type of partition 'Linux' to 'Linux LVM'

Command (m for help): p # 再次打印查看,可以发现sda3 类型改变成功

Disk /dev/sda: 10.5 GB, 10485760000 bytes, 20480000 sectors

   Device Boot      Start         End      Blocks   Id  System
/dev/sda1   *        2048     1050623      524288   83  Linux
/dev/sda2         1050624     8249343     3599360   8e  Linux LVM
/dev/sda3         8249344    20479999     6115328   8e  Linux LVM

Command (m for help): w # 修改完毕后,保存退出
The partition table has been altered!

Calling ioctl() to re-read partition table.

WARNING: Re-reading the partition table failed with error 16: Device or resource busy.
The kernel still uses the old table. The new table will be used at
the next reboot or after you run partprobe(8) or kpartx(8)
Syncing disks.
# 注意这里报了设备或资源忙的错误,提示下次reboot后生效,或者可以运行partprobe,不知道是否影响,按提示 运行该命令
[root@localhost centos]# partprobe
使用新分区创建PV并扩展root lv:
先放几个命令的注释在这里:
- pvcreate - Initialize physical volume(s) for use by LVM
- vgextend - Add physical volumes to a volume group
[root@localhost centos]# pvcreate /dev/sda3
  Physical volume "/dev/sda3" successfully created.

[root@localhost centos]# pvs # 再次查看pv,可以看到新的pv,还没有分配到VG里
  PV         VG     Fmt  Attr PSize  PFree
  /dev/sda2  centos lvm2 a--  <3.43g    0
  /dev/sda3         lvm2 ---   5.83g 5.83g

[root@localhost centos]# vgextend centos /dev/sda3
  Volume group "centos" successfully extended

[root@localhost centos]# vgs # 再次查看VG,发现此时多了一个PV,且多了5G的free space可以分配了
  VG     #PV #LV #SN Attr   VSize  VFree
  centos   2   2   0 wz--n- <9.26g <5.83g

[root@localhost centos]# pvscan # 查看pv的使用情况,确认sda3完全空闲
  PV /dev/sda2   VG centos          lvm2 [<3.43 GiB / 0    free]
  PV /dev/sda3   VG centos          lvm2 [<5.83 GiB / <5.83 GiB free]
  Total: 2 [<9.26 GiB] / in use: 2 [<9.26 GiB] / in no VG: 0 [0   ]

# 此时就可以进行LV扩展了,我们这里只用了root这个LV,所以把它扩展到使用全部空余空间:
[root@localhost centos]# lvextend -r -l +100%FREE /dev/mapper/centos-root
  Size of logical volume centos/root changed from <2.93 GiB (750 extents) to <8.76 GiB (2242 extents).
  Logical volume centos/root successfully resized.
data blocks changed from 768000 to 2295808

[root@localhost centos]# df -h
Filesystem               Size  Used Avail Use% Mounted on
/dev/mapper/centos-root  8.8G  2.6G  6.3G  30% /
/dev/sda1                509M  143M  367M  29% /boot